Sharing a Database on a Local Area Network
If all of the computers are running on the same local area network, then the clear choice is to share them on the LAN. All you need to do is to install SixBit on all the computers that you want to use SixBit on and then point them to all use the same database on one of those computers.
This method is best for multiple person operations that are all located in the same physical location. You can still gain remote access to the database using a remote connection, but for all computers that are physically in the same location, a LAN will provide faster response times.
Preparing the Server and Clients for Network Access
Before client computers can access a shared SixBit database, the server must be set up to host and share the database securely. In this section, you will first share the database from the server and configure the Windows Firewall to allow access over the local network. After the database is visible on the network, you can connect the client computers and confirm that network access is working correctly.
To turn on Network Discovery and File and Printer Sharing in Windows 10 or Windows 11:
Before you adjust any firewall settings, confirm that Network Discovery and File and Printer Sharing are turned on for the server and for every client computer that will use the shared database. These settings allow Windows to recognize and communicate with other computers on the local network, which SixBit requires to locate the database server. If these options are turned off, the computers may not be visible on the network.
- Open the Control Panel, click Network and Internet, and then click Network and Sharing Center.
- In the left pane, click Change advanced sharing settings.
- Under the Private network section, turn on Network discovery, check the box for Turn on automatic setup of network connected devices, and turn on File and printer sharing.
- Under the All Networks section, set the following options.
- For Public folder sharing, select Turn on sharing so anyone with network access can read and write files in the Public folders.
- For File sharing connections, select Use 128 bit encryption to help protect file sharing connections (recommended).
- For Password protected sharing, first try Turn off password protected sharing. This allows other computers on the network to connect without requiring Windows credentials. If client computers still cannot connect, return to this window, select Turn on password protected sharing, and try again.
- Click Save changes when finished.
|
|
Note: Some newer Windows 11 computers may require Password protected sharing to be turned on for successful connections. In that case, users must sign in with valid Microsoft network credentials. The credential prompt will typically appear when trying to access shared pictures from the client computers. |
Once these settings are enabled, your computers will be able to locate each other on the network. You can then proceed to configure the Windows Firewall on the server to allow access to the SixBit database.
Allowing SixBit to access the database through your Windows 8/10/11 server firewall:
To allow SixBit to access the shared database from the clients, the Windows Firewall on the database server must permit both SQL Server and SQL Browser to communicate over the network. The steps below explain how to add these programs to your firewall exceptions list.
- On the database server, from Windows Control Panel, select System and Security, then under Windows Firewall on the left side choose Allow a program through Windows Firewall.
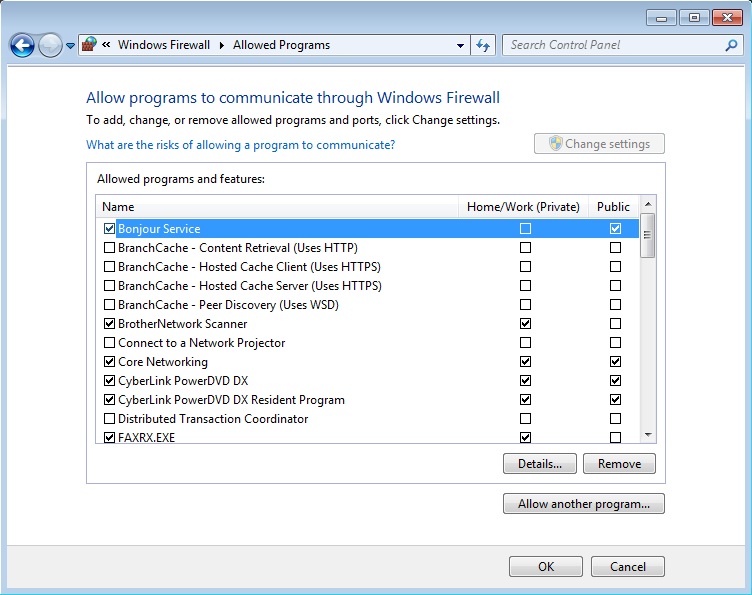
- Click Change settings, then click the Allow another program... button.
- Click the Browse button and browse to the location of the instance of SQL Server that you want to allow through the firewall. For example, SQL Server 2014 with an instance name of SIXBITDBSERVER is located at C:\Program Files\Microsoft SQL Server\MSSQL12.SIXBITDBSERVER\MSSQL\Binn. You may need to change the MSSQL12.SIXBITDBSERVER depending upon the version of SQL Server you have installed. Select the file named sqlservr.exe and click Open, then OK
- While still in Windows Firewall, click the Allow another program... button again. Browse to the location of your SQL Browser. This may be different depending upon current and past versions of SQL Server that have been installed. For example, you may find it at C:\Program Files (x86)\Microsoft SQL Server\90\Shared\sqlbrowser.exe. If not there, try replacing the 90 with 100. If you still cannot find it, do a search for sqlbrowser.exe. Select the file named sqlbrowser.exe and click Open, then OK.
|
|
Note: All computers sharing the database must be running the same released version of SixBit. When you first upgrade and run SixBit on one computer, the program may apply database updates. Other computers will not be able to connect until they are updated to the same version. |
Allowing TCP/IP for SQL Server:
Before connecting additional computers to the shared database, you will need to verify that the SQL Server instance is configured to allow network connections. In particular, the TCP/IP protocol must be enabled for the SIXBITDBSERVER instance and the service restarted so the changes take effect.
- Using the Windows Run prompt (Win+R), type "SQLServerManager12.msc" and hit Enter to open the SQL Server Configuration Manager. Note, the number at the end may need to change based on the installed version of SQL Server.
- Go to the Network Configuration area, click Protocols for SIXBITDBSERVER. select "TCP/IP" and right-click Enable.
- Restart the SQL Server instance from the Services window (Win+R, type "services.msc" and hit Enter, then right-click "SQL Server (SIXBITDBSERVER)" and click Restart).
Connecting the Client to the Server:
- At this point, SixBit should already be installed on the computer acting as the database Server. If you have not already, install SixBit on each additional computer that will connect to the shared database.

Note: When installing SixBit on the Clients you can select the option during installation to "Use and Existing SQL Server instance" and skip the SQL Server portion of the installation. - On each Client computer, the location of the shared database must be specified. From the File menu, select Database > Open Database. The Open Database window will appear.
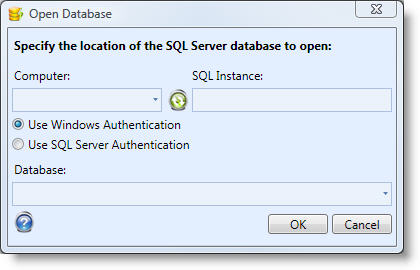
- From the Open Database window, choose the Computer that hosts the database. If you click the drop down, it will find a list of computers on the local network to choose from.
- Enter the SQL Instance to open. Multiple copies of SQL Server can be installed on any given computer. Each copy is called an instance. A list of instances on the selected computer will appear in this drop down. By default, SixBit is installed to the SIXBITDBSERVER instance.
- Choose your type of authentication. SixBit was installed to use either type of authentication. Both types of authentication will work on a LAN, however, for Windows Authentication to work you must have a domain controller. We recommend you just use SQL Server Authentication. By default, SixBit uses a userid of "sa" and a password of "S1xb1tR0x". Versions prior to 1.00.052 used a password of "sixbit".
- A list of databases in the selected instance will appear in the Database drop down. Choose the database to open. By default, SixBit is installed with the name "SixBit". Click OK when finished and you will be connected to the database on the server.
If the Database drop down is empty, then it means SixBit is having trouble connecting to the other computer. The most likely cause is firewall settings on the server. Both the SQL Server program and SQL Server Browser must be added to your firewall exceptions list. In addition, a few ports must be opened.
|
|
If you want to verify that it is a firewall problem, then try turning off the firewall on the computer with the database and reconnecting. If you now see the list of databases, then you know it is a firewall issue. You can solve it by adding the proper permissions as described below. |
Picture Configuration for databases using External Picture Storage:
If your server is configured to use external picture storage, the picture folder must also be shared on the network so that all client computers can access it. After the folder is shared, point each client computer to that network location, just as you did for the shared database. When Password protected sharing is turned on, Windows will prompt for valid Microsoft network credentials the first time a client connects to the shared picture folder.
For detailed steps on sharing the picture folder from the server and pointing SixBit to that shared location on each computer, please see the following User’s Guide page on Picture Storage.