Batch Changing Pictures
The Batch Change Pictures feature is designed to optimize adding and changing pictures associated with an item. It allows users to insert, replace or delete a picture or pictures for any number of selected items. Batch Change Pictures functionality is only available to users with Small Business and Enterprise Editions.
Pictures can be added to an item one at a time, but there are instances when adding pictures to multiple items at the same time can be more efficient. For example, some sellers use the same picture on multiple listings. This may be a color sample image, the sellers logo, a common sizing chart, etc. Rather than insert the picture individually to each item, it can be inserted into multiple items at the same time. Deleting or replacing the picture is just as easy.
In addition, the Batch Change Pictures option has some advanced features for allowing the addition of pictures based upon information in the item. For example, pictures that are stored on the hard drive using the SKU as their name can be automatically imported and assigned to the item with the same sku.
| Any batch changes to pictures cannot be undone. Before making any large scale changes to pictures, we recommend making a backup of the database just in case the batch change does not behave as you expected it to. |
To batch change pictures:
Open the Sell Items mode. How?How?
Select one or more items from the grid to change their pictures.
- In the Pictures group in the ribbon bar, click the arrow under the Modify button and choose Batch Change Pictures.

- Choose the Action to be performed.
| Action | Description |
Insert |
Insert picture(s) into the selected items. |
| Replace | Replace existing picture(s) with new picture(s). |
| Delete | Delete pictures from the selected items. |
- Choose the Location for the picture(s) to be changed depending on the action:
| Insert Location | Description |
| First | places all pictures to be inserted before all existing pictures on the item(s) |
| Last | appends all pictures to the end of the list of pictures on the item(s) |
| Before | places all pictures immediately before the specified Picture # (e.g. for pictures A,B,C,D adding X,Y,Z before 2 will result in A,X,Y,Z,B,C,D). If the Picture # specified is greater than the number of pictures on the item, pictures are treated as Insert Last. |
| After | similar to Before, but the specified index remains before the added pictures. (e.g. for pictures A,B,C,D adding X,Y,Z after 2 will result in A,B,X,Y,Z,C,D). If the specified index is greater than the number of pictures on the item, pictures are treated as Insert Last. |
| Replace Location | Description |
| First | replaces the first picture with the new pictures. (e.g. for pictures A,B,C,D replacing first with X,Y,Z will result in X,Y,Z,B,C,D) |
| Last | replaces the last picture with the new pictures. (e.g. for pictures A,B,C,D replacing last with X,Y,Z will result in A,B,C,X,Y,Z) |
| Before | replaces all pictures before Picture # with the new pictures. (e.g. for pictures A,B,C,D replacing Before 3 with X,Y,Z will result in X,Y,Z,C,D) |
| After | replaces all pictures after Picture # with the new pictures. (e.g. for pictures A,B,C,D replacing After 2 with X,Y,Z will result in A,B,X,Y,Z) |
| Specific | replaces the specified Picture # with the new pictures. (e.g. for pictures A,B,C,D replacing Specific 2 with X,Y,Z will result in A,X,Y,Z,C,D) |
| All | replaces all pictures with the new pictures. (e.g. for pictures A,B,C,D replacing All with X,Y,Z will result in X,Y,Z) |
| Delete Location | Description |
| First | deletes the first picture on item(s) |
| Last | deletes the last picture on item(s) |
| Before | deletes all pictures before Picture #. (e.g. for pictures A,B,C,D deleting Before 3 will result in C,D) |
| After | deletes all pictures after Picture #. (e.g. for pictures A,B,C,D deleting after 3 will result in A,B,C) |
| Specific | deletes the specified Picture #. (e.g. for pictures A,B,C,D deleting 2 will result in A,C,D) |
| All | deletes all pictures |
When inserting or replacing, choose the Path to the new picture(s). The path can contain one or more picture paths separated by semicolons. Each path can be a path to a local picture (i.e c:\Pictures\mypic.jpg) or a URL on the internet (i.e. http://www.mysite.com/pics/mypic.jpg).
In addition, Paths can contain replacement variables to assist in finding pictures dynamically in different locations.
For example, assume that all cell phone pictures are stored on the hard drive at c:\phones\s-l400-1.jpg and c:\phones\s-l400-2.jpg, where "phones" is also a folder in SixBit and "s-l400" is the SKU of a phone in SixBit. These pictures can be inserted dynamically by including replacement variables in the path. In the example above, the existing picture for the phone will be replaced by the two new pictures. The paths included a [[Folder]] variable and a [[SKU]] variable. During the batch change SixBit will resolve the variables for each item and look for pictures at the resolved locations. If a picture is found at the resolved location, it will be inserted, if the picture is not found, it is skipped.
The Flip icon in the lower right corner can be used to see more details about a particular picture including the resolved path.
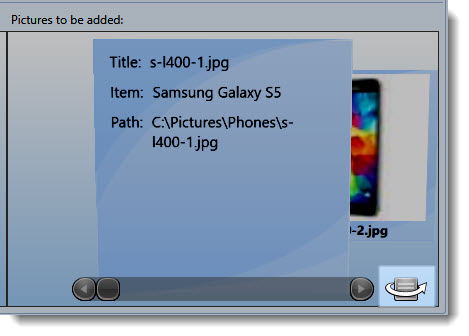
As you can see the path resolved to "c:\Pictures\Phones\s-l400-1.jpg".
Any item variables can be used, popular ones for this purpose include [[SKU]], [[ItemID]], [[ExternalItemID]], [[ProductID]], [[Folder]] etc. SKU is the only unique identifier on a variation, so when adding paths with replacement variables to variations, the [[SKU]] must be in the path. By creating a consistent naming and storage scheme on the hard drive or web space, pictures can be imported and assigned to the correct item with just a few button clicks.
If after resolving all paths for a replacement none of the pictures are found, the replacement will be aborted leaving the original pictures in tact.
When using the Browse button, selected pictures will be appended to existing pictures in the Path window. This allows for selection of pictures from multiple directories.
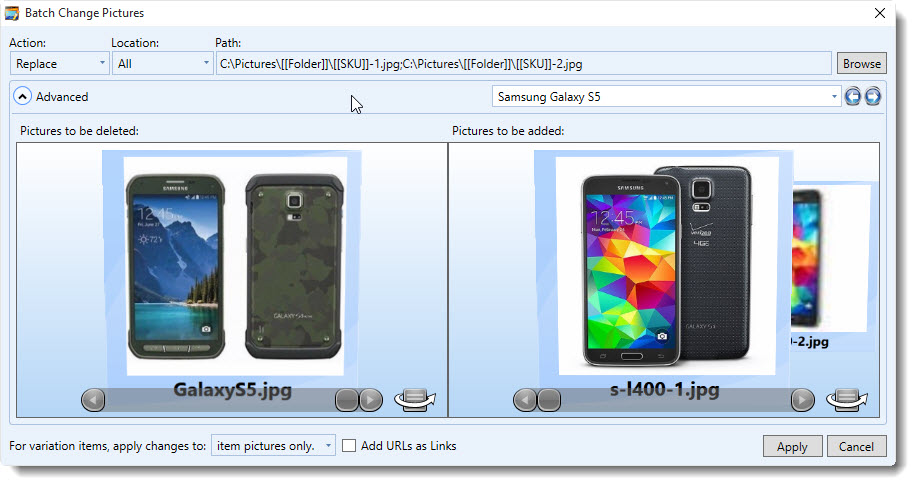
If desired, use the Advanced expander to see a preview of the pictures that will be deleted or added.
 Use the dropdown
list of items or the navigation arrows to see the pictures that will
be affected for any given item.
Use the dropdown
list of items or the navigation arrows to see the pictures that will
be affected for any given item.

Clicking the Flip icon in the lower right corner will turn the picture over to show detailed information about the picture including the resolved path, and which item/variation it will be assigned to.
|
The displayed pictures are compressed before displaying in the carousel. The larger the original pictures are, the longer it will take for them to display in the carousel. Since jpeg compression is being used and pictures are being displayed on a computer monitor which has a relatively low resolution when compared to printers, it is not necessary to use the high quality settings on your camera for taking item pictures. This will only result in taking extra time to compress. |
Variation items can have pictures for each variation as well as pictures for the overall item. When changing pictures on variation items, specify how the pictures should be added under For variation items, apply changes to:
| Value | Description |
| item pictures only | Changes will only be made to the core item pictures. The pictures on each variation will not change. |
variation pictures only |
Changes will apply only to the variation pictures and not the core item pictures. |
item and variation pictures |
Changes will affect both the core item pictures and variation pictures. |
This setting will not affect how the changes are made to non variation items.
When adding pictures from URL's they can be added as links only by checking Add URLs as Links.
Click Apply.