Using Substatuses
Most of the workflow can be handled by the major statuses in each mode, however, there are cases where you may need more granular statuses to breakout the workflow process. Substatuses perform this role nicely. Initially, SixBit is delivered with default substatuses under several of the statuses.
| The number of items in a substatus will be displayed to the right of the substatus name. The number of records in a substatus is NOT included in the count of records in its parent status. |
To further customize SixBit you are free to add your own substatuses to mimic a workflow.
The following can be performed::
Default Substatuses
Let's discuss the substatuses that come with SixBit by default.
There may be times that an item must be temporarily removed from a workflow and go into a sort of holding pattern. For example, an item record may be almost ready to list, however, you are waiting for it to be delivered from the supplier before all information is entered. Another example could be that an item may have been sold, however, the buyer requested engraving and the item will be temporarily removed from the workflow so the postage and packing lists are not printed until the item is back from the engraver.
On Hold substatuses can be found in the "Under Construction" status within Selling Items), as well as in the "Awaiting Payment" and "In Process" status within Ship Orders. The "Fulfilled" status within Ship Orders has a substatus called "Return in Transit" that is also an On Hold status. The Return In Transit status is designed to hold shipped orders that the buyer has notified you that they are returning.
Custom Substatuses
To help you customize SixBit to your business, the built-in substatuses can be renamed or additional substatuses can be created.
Items Workflow
Let's suppose you have two employees who help create items; Tom enters the pictures, Jerry enters everything else, and then you review it before moving it to Awaiting Upload. In this case, the "On Hold" substatus could be renamed to "Pictures Entered", then create an additional status called "Description Complete". Tom would create the new items and add the pictures, then as he leaves the item window, he could set the substatus to "Pictures Entered". Jerry checks in periodically and opens any items he finds in the "Pictures Entered" substatus and adds the descriptions. When finished, he moves them to "Description Complete". You check in each night and review the "Description Complete" items and then move them to "Awaiting Upload" or an upload list under "Awaiting Upload". No matter how many steps there are in the process, a custom status can be created to manage the workflow.
Orders Workflow
 Some
lucky people have inventory in stock and ready to ship when it is sold,
but many sellers need to wait before they can ship. Perhaps they
are waiting for the item to be delivered from their supplier or they have
to perform some customization on the item before shipping. Let's
take the example of someone who sells custom dried beef jerky. When
purchased, the buyer chose the cut of beef, the flavor, and the amount.
To guarantee freshness, the jerky isn't made until the order comes
in. The steps in making jerky are cutting the beef, marinating it,
drying it, and wrapping it. These processes take several days and
with new orders coming in each day this can be very confusing. To
keep it all straight, the seller creates the following substatuses under
the "In Process" status:
Some
lucky people have inventory in stock and ready to ship when it is sold,
but many sellers need to wait before they can ship. Perhaps they
are waiting for the item to be delivered from their supplier or they have
to perform some customization on the item before shipping. Let's
take the example of someone who sells custom dried beef jerky. When
purchased, the buyer chose the cut of beef, the flavor, and the amount.
To guarantee freshness, the jerky isn't made until the order comes
in. The steps in making jerky are cutting the beef, marinating it,
drying it, and wrapping it. These processes take several days and
with new orders coming in each day this can be very confusing. To
keep it all straight, the seller creates the following substatuses under
the "In Process" status:
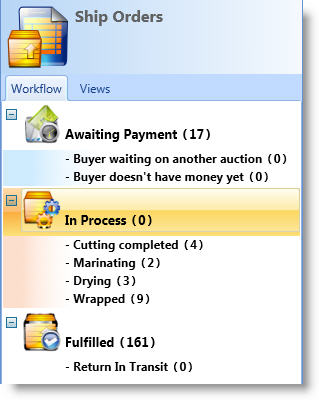
- Cutting completed
- Marinating
- Drying
- Wrapped
As new orders come in, the seller cuts the beef and places the order in "Cutting completed". His wife then puts the beef in the marinade and moves the order to "Marinating". The next day, she puts it in the dehydrator and sets the status to "Drying", and finally each day the seller removes the meat from the dehydrator, wraps it and moves it to "Wrapped". Their son handles all the shipping so he prints postage and packing lists for all the wrapped orders and ships them off.
- Right click the substatus that will be renamed.
- Select "Rename".
- Enter the new name.
- Click "OK".
- Right click any substatus area that another substatus will be added to.
- Select "Add".
- Enter the new name.
- Click "OK".
- Right click the substatus that will be deleted.
- Select "Delete".
- All records in the substatus will be moved to its previous parent's status.
- Right click the substatus that will be reordered.
- Select "Move Up" or "Move Down".