See Also
Using Item Status for Workflow
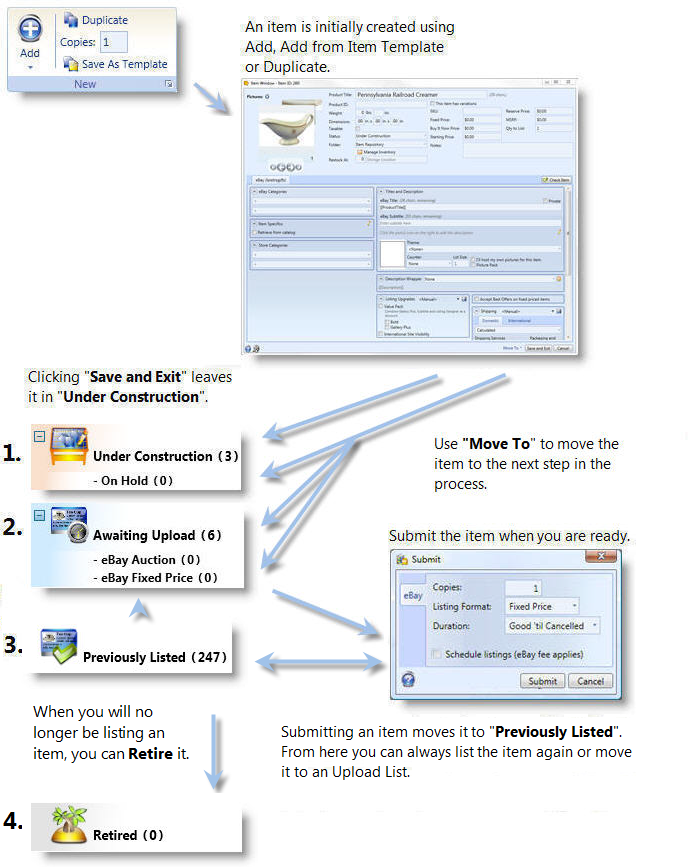
Item Statuses and Substatuses will help you keep track of your item as they proceed through their life cycle. All item records are created and then listed. Some items are listed many times during their life. The status assigned to an item will determine where it is in that process and what actions need to be performed on it.
The following illustration describes the life cycle of an item.
The following table describes the different statuses and how they are automatically set.
| Status/Substatus | Description | How It's Assigned |
| Under Construction | The item is in the process of being entered into the database, but isn't quite ready to be listed. | Any newly created item by any means (Add, Add from item template, Duplicate) will have its status set to "Under Construction". When exiting the Item Window, if you are not finished editing the item, choose "Save and Exit" and the item will remain in "Under Construction". |
| Under Construction - On Hold | The item is in the process of being entered but some data or event is preventing completing the entry. | When exiting the Item Window,
the "Move To" button can be used to place the item in
the On Hold substatus.
You can also place items on hold simply by dragging
them to this substatus.
On Hold is the default holding place for pending items. You can rename this substatus and create additional substatuses to mimic your workflow. For example, you could create substatuses of "Description Entered", "Picture Entered", etc. See Using Substatuses for more information. |
| Awaiting Upload | The item is ready to be uploaded the next time you post listings. | If you select "Awaiting Upload" from the "Move To" button when exiting the Item Window, your item will get a status of Awaiting Upload. If you want to flag items from your repository to be listed, you can also add or move them into "Awaiting Upload" by right clicking and choosing "Add to Upload List" or "Move to Upload List". Additionally, items can be dragged into the appropriate status or substatus. |
| Awaiting Upload - Upload List | The item is ready to be uploaded to a particular site or listing format. | When exiting the Item Window,
the "Move To" button can be used to place the item in
any Upload List.
You can also place items in an upload list simply
by dragging them into the list. An item can be in multiple
lists at the same time.
Initially a list for each format on each site will be created, but you can create your own upload lists for any purpose. For example, "List on Sunday". See Managing Upload Lists for more information. |
| Previously Listed | The item has been listed once and will now appear in this status in case you want to list it again. | When an item is submitted to any site, its status is set to "Previously Listed". All items imported from an eCommerce site will have their status set to "Previously Listed". |
| Retired | All available quantities of the item have been sold and you won't be getting any more. | When you no longer want to see items in your Previously Listed status, drag them to the Retired status. |
Of course you can also manually set any of the statuses or substatuses as well by dragging the item into the status/substatus or by right clicking and choosing Set Status.
| If you want to relist an item in the Previously Listed status, you don't need to move it into "Awaiting Upload". You can just click it and submit it. If you want to create a list of items from your repository to be listed at a later date, simply drag them from the repository into "Awaiting Upload" or one of the Upload Lists under "Awaiting Upload".. |
| Items are color coded by status to help you easily identify them in the repository. |
To manually change an items status by dragging and dropping:
- Select the item record(s).
- Drag and drop them into the desired status. You will notice the counts on the statuses change.
To manually change an items status from the Item Window:
- Select the item record(s).
- Click the Edit button in the ribbon to open the Item Window.
- From the Status dropdown, choose a status and click "Save and Exit".