See Also
Backing Up Your Data
 The SQL Server database that SixBit is built on is a very solid database, but nothing can protect you from floods, fire, or bad hard drives better than a regular backup program. It is highly recommended that frequent backups are made of your database and if at all possible, store them on a different drive or at a different location.
By default, your database will be backed up once a day and 3 past copies will be kept. You can choose the computer that the backups are stored on, the time of day to make the backup, and the number of copies to keep from the Options window.
In this topic, you will learn how to:
To manually backup your database within SixBit:
- From the File menu, select Database|Backup Database. Show me the File MenuShow me the File Menu.
-
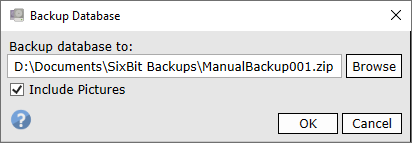
The Backup Database window will appear. By default, it will have chosen a location in the Documents folder. This location can be kept or click the Browse button to select a new location.
|
|
A SQL Server database consists of 2 files, an .mdf and an .ldf file. The files backed up by SixBit will be compressed into a zip (.bak) to make them easier to keep track of and to save storage space on your hard drive. |
- Click OK to begin the backup. When completed, the window will close.
- Note: There may be an issue with folder permissions. In this case, please review the SixBit Knowledgebase article here.
To backup your data with an existing backup program:
If you have a backup program that runs nightly, just add the SixBit.mdf and SixBit_Log.ldf files in the [ProgramFiles]\Microsoft SQL Server\MSSQLXX.SIXBITDBSERVER\MSSQL\Data folder to your backup list. Please note that the XX's in MSSQLXX may change based on the version of SQL Server you have installed.
To modify the automatic backup properties:
-
Open the SixBit Options window. How?How?
- Select the Backups tab.
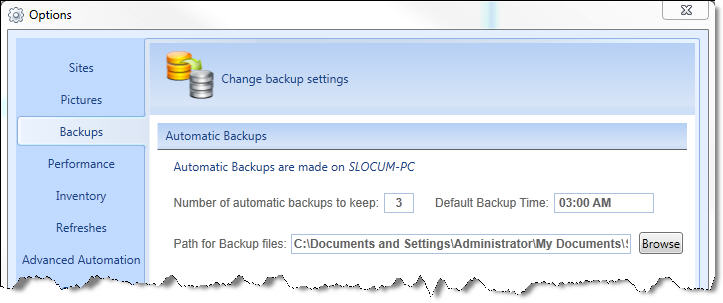
- The computer that hosts the backups will be displayed. If it is not the current computer, you will have the option to click the Make this computer the backup computer button.
|
|
It is highly recommended that if you have a slow network connection or are running across a VPN network or SQL Server database on a web server that you make the server, the backup computer. Making any other computer the backup computer will require all of the database data to travel across the network regularly and will slow down your performance. |
- Set the Number of automatic backups to keep value. A higher number will require more disc space, but will provide greater security.
- Set the Default Backup Time that you would like backups to be made. This is the time of day each day when you want the backups made. You would usually set this to a time after all your work for the day is done. If the computer is off when this time passes, then the backup will be made the next time you start your computer.
- Set the Path for Backup Files to the location that you would like to store your backups. This can be on the current computer or another computer on your network as long as you can guarantee you will have access to the location when the backup time passes.
|
|
.The Database Backup warning  will flash in the status notification bar in the lower left corner of the main window whenever backups are not properly being made. Refer to Status Notifications for more information. will flash in the status notification bar in the lower left corner of the main window whenever backups are not properly being made. Refer to Status Notifications for more information. |