See Also
- Editing a Profile
- Renaming a Profile
- Assigning a Profile to an Item
- Viewing Data by Profile
- Entering Sales Tax Collection Info
- Setting Up a Profile
- Starting SixBit
- Entering Your Profile Name and Logo
- Entering Shipping Origin
- Multiple Selling IDs
- Creating a Profile
- Entering Packing List Messages
- Deleting a Profile
- Entering Seller Account Information
- Entering a Picture Host
Entering Email Information
The user's email address is collected so it can be included in any correspondence or as a contact point for any shipping insurance that is purchased. In addition, user email account information is collected so SixBit can send emails on the user's behalf.
To enter email information:
- Open the user Profile. How?How?
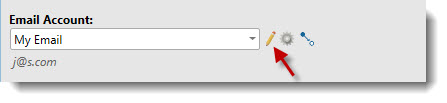
- Click the pencil icon in the Email Account section.
Enter the user email address in the Email Address field.
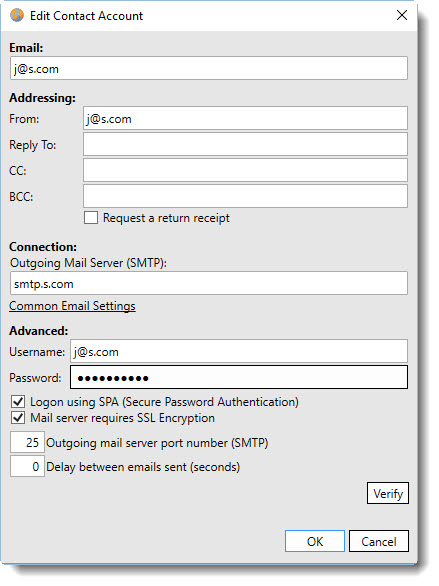
4. Enter email information as follows:
| Section | Field | Description |
Addressing |
From |
Enter the email address that the recipient will see as the sender.
NOTE: To get the user's email address appear as the user's name or company name instead of just an address, enter it in the form of:
"Company ABC <sales@companyabc.com>" |
|
Reply To |
Enter the email address that replies should be sent to. If not provided, it will default to the From address. |
|
CC |
Enter an optional email address to receive Carbon Copies of any emails that are sent. |
|
BCC (Blind CC) |
Enter an optional email address to receive a copy of any emails sent without the recipient seeing the address. |
|
Request a return receipt |
Check this box if to be notified when the recipient receives the email. |
Connection |
Outgoing Mail Server |
Enter the name of the outgoing SMTP server. This information can be obtained from the user's existing email program or mail provider. Click the Common Email Settings link if unsure of the settings and want to see if the provider is in the list. |
Advanced |
Userid |
Enter the userid of the email account. |
|
Password |
Enter the password of the email account.
|
|
Login using SPA |
Check this box if the server requires Secure Password Authentication |
|
Mail server requires SSL Encryption |
Check this box if the server requires SSL Encryption |
|
Outgoing mail server port number |
Enter the outgoing mail server port (usually 25) |
|
Delay between emails (seconds) |
If the mail server limits the amount of mail that can be sent in a period of time, a delay between each email may be necessary. |
- When the necessary information is added, click the Verify button to send a test email and make sure the connection settings are working properly. If the verification is successful, click OK to exit the window. If the verification fails, click Common Email Settings to open the Knowledgebase article about the recommended settings for common email services.