See Also
- Cancelling Orders
- Recording Missing Shipments
- Reconciling Inventory
- Processing Returns
- Setting Up Inventory Handling Rules
- Viewing Available Inventory
- Adding Inventory Information on an Item
- Inventory Report
- Automatic Relisting
- Merging Inventory
- Collapsing Purchases
- Managing Inventory
- Recording Drop Shipment Inventory
Recording Stock Inventory Purchases
Different types of items can require different levels of recording purchase information. Some items will either never have an inventory greater than 1, or will always have the same price and supplier. This can include items picked up at garage sales, one of a kind collectibles, etc. These single purchase items only need to keep track of a single purchase at a single price. Other items may be replenished many times at many different prices. This would include items that are acquired from a supplier or that are made in house. These multiple purchase items need to have detailed purchase history information so profit and loss reports will know how many of each item at each price were purchased.
Fortunately, SixBit is designed to allow for easy, quick entry of quantities, costs and suppliers for single purchase items, while still providing the ability to record detailed purchase records for multiple purchase items.
Single Purchase Inventory Entry
For single purchase items, the quantity, cost and supplier will be recorded directly on the Items window.
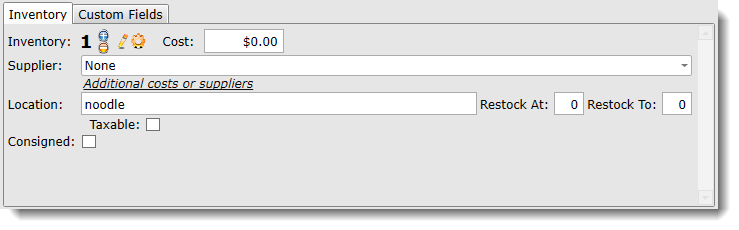
When the supplier, cost, invoice number, and PO number are not going
to change, changes to the inventory quantity can be made directly on the
Item window using the ![]()
![]() or
or ![]() icons.
icons.
Multiple Purchase Inventory Entry
When multiple purchases will be made with different costs, suppliers, invoice numbers or PO numbers, separate purchase records should be recorded. By accurately recording inventory purchases as the inventory is acquired, you will be able to avoid overselling and be able to maintain accurate profit and loss information.
When a sale occurs, it will reference the inventory purchases for an item and it will assign the oldest remaining inventory to the sale. By associating sales with particular purchases, you will know exactly how much you paid for an item that was sold even though the items may have been purchased multiple times at multiple prices.
Information for the first purchase of an item can always be made on
the Item window. Once a second purchase with different costs, supplier,
invoice number or PO number is made, additional purchase records can be
made by clicking the ![]() icon which will open the Purchase
History window.
icon which will open the Purchase
History window.
Let's take a look at the purchase history for a sample item.
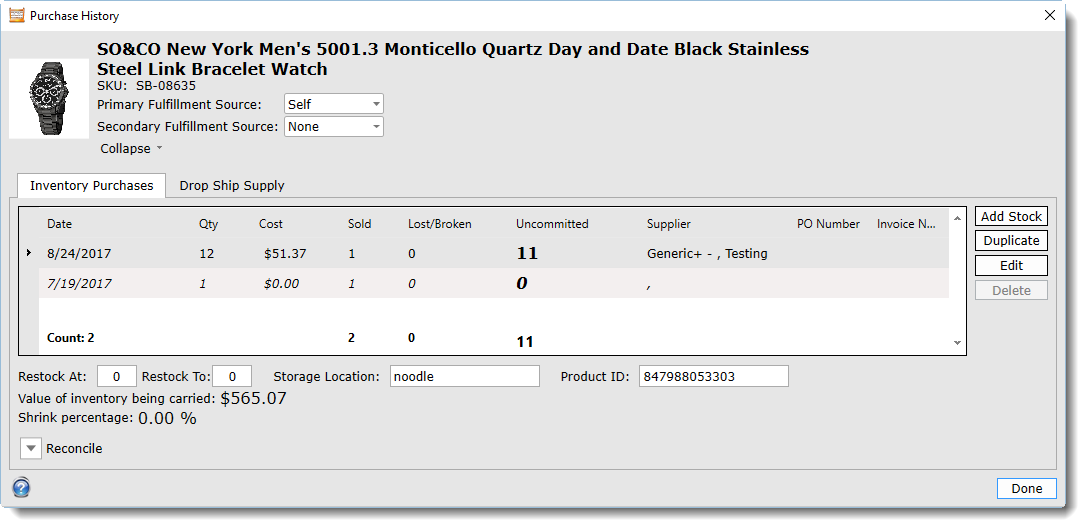
Newer inventory purchases appear at the top. You can see from the example, that the seller acquired a vendor sample of 1 item on 7/19/2017, then purchased another 12 on 8/24/2017 for $51.37 each. The sample and one of the purchased inventory have been sold. The tinted background indicates that all items from that purchase have sold.
The uncommitted column contains the number of items that have not been committed to an actual buyer yet. This includes items that have not been listed and items that are listed but not yet sold.
From the summary row, we can see that of the 13 items purchased, 2 have sold,and 11 are still waiting for buyers.
Below the grid, you will see that the total value of the inventory being carried is $565.07 which is the value of inventory that still has not been sold (11 * $51.37). The shrink percentage is the percentage of the total value that has been lost, broken, or stolen. i.e. $234.00 / ((12 * $234.00) + (20 * $239.00) + (10 * $229.00))
In this topic you will learn about:
- Adding stock to items with only one purchase record
- Adding additional purchase records
- Editing past purchase records
- Deleting purchase records
- Batch editing suppliers
When you only have a single purchase of an item, or when all purchases have the same cost, supplier, invoice number and PO number, the inventory can be managed directly from the Item window.
To add stock to items with only one purchase record:
| Once a second purchase record has been added to an item, the inventory fields on the Item window can no longer be modified to update inventory. The Purchase window must be used for all future updates. See Collapsing Purchases to learn how to collapse multiple purchase records back into a single purchase record. |
- Open the Sell Items mode. How?How?
- Double-click the item in the grid for which stock will be added to open it in the Item window.
- To increase or decrease the quantity one at a time, click the
 or
or  icons next to the inventory quantity.

- To set the inventory to a particular quantity, or to add or subtract
a quantity, click the
 icon,
then choose, the action to be performed and the quantity, then click
OK.
icon,
then choose, the action to be performed and the quantity, then click
OK.

- Optionally, enter the Cost.
- Optionally, specify the Supplier.
- Optionally, enter the Restock At and Storage Location.
To add additional purchase records:
- Open the Sell Items mode. How?How?
- Select the item in the grid for which stock will be added.
- Click the Manage button in the Inventory group on the Ribbon bar. The Purchase History window will appear.
OR
Double-click the item in the grid for which stock will be added to open it in the Item window.
Click the Manage icon
 next to the inventory quantity or the Additional Costs or Suppliers link under
the Supplier dropdown.
next to the inventory quantity or the Additional Costs or Suppliers link under
the Supplier dropdown.
- Click the Add Stock button. Alternatively, a purchase record that is similar to the one that will be added can be selected and the Duplicate button can be used.
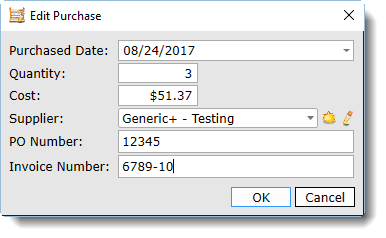
- Enter the Purchased Date, Quantity, Cost (per item), and optionally Supplier.
- Click the New icon (
 )
to enter a new supplier or the Edit
icon () to edit the selected
one.
)
to enter a new supplier or the Edit
icon () to edit the selected
one. - If you purchased the items under an internal Purchase Order number, enter it in the PO Number field.
- If the supplier provided an Invoice Number that you want to record, enter it.
- Click OK when finished.
| Once a second purchase record has been added to an item, the inventory fields on the Item window can no longer be modified to update inventory. The Purchase window must be used for all future updates. See Collapsing Purchases to learn how to collapse multiple purchase records back into a single purchase record. |
- Open the Sell Items mode. How?How?
- Select the item in the grid that will be edited.
- Click the Manage button in the Inventory group on the Ribbon bar. The Purchase History window will appear.
- Select the purchase history record to edit and click the Edit button.
- Make any modifications and click OK when finished.
| Once an purchase has been associated with a sale, it can no longer be deleted. |
- Open the Sell Items mode. How?How?
- Select the item in the grid that will be edited.
- Click the Manage button in the Inventory group on the Ribbon bar. The Purchase History window will appear.
- Select the purchase history record to delete and click the Delete button.
In addition to editing Suppliers one at a time, suppliers can also be batch edited. This allows for editing supplier info on multiple suppliers at the same time.
To edit multiple suppliers in a batch:
- Open the Check Items mode. How?How?
- From the grid, select the items for the suppliers that will be revised.
- Click the arrow under the Edit button in the ribbon bar and choose Batch Edit Suppliers.
- Consult Using the Batch Edit Window for information on making changes to the suppliers.