See Also
- Notifying Consignors
- Adding Notes to an Item
- Adding Inventory Information on an Item
- Adding Weight and Dimensions to an Item
- Adding an Item from an Item Template
- Adding an Item from Scratch
- Creating Items
- Deleting Items
- Duplicating Items
- Entering Listing Upgrades
- Entering eBay Listing Information
- Entering eBay Shipping Information
- Entering Payment Information
- Entering Item Data
- Importing Data into SixBit
- Saving an Item as an Item Template
- Entering Title and Description
- Entering an Allocation Plan
- Entering Etsy Information
- Entering Product and Shipping Info
- Entering Tags and Materials
- Entering Categories and Attributes
- Entering Item Specifics
- Entering eBay Catalog Information
- Adding Items in Bulk
- Printing Inventory Labels
- Adding Pricing Information to an Item
- Adding Product Information to an Item
- Editing Items
- Entering Categories
- Managing Pictures on an Item
Setting an Item as a Consignment
When an item is received for consignment, it will need to be entered into SixBit along with the information about the consignor. Creating a consignment item will be very similar to creating a regular item. The only difference between creating a consignment item and a regular item is when the inventory is entered, a consignor will be identified instead of a supplier and the item will be flagged as a consignment item along with the applicable consignment plan.
To add a Consignment Item:
- Open the Sell Items mode. How?How?
- From the Create tab on the ribbon bar, click the top of the split Add button. You could also click the arrow under the Add button and choose (Default).
- An empty item window will appear. Fill in the item record just as it would be done with any other item, as described in Entering Item Data with the following differences.
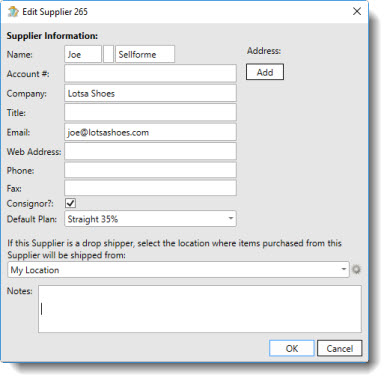
- When entering the item inventory from the Add Stock or Manage Purchase Records buttons, the supplier will be the consignor. A new supplier record can be created for the consignor if they have not already been added to the database. When entering the Consignor info, check the Consignor? box and enter the Default Consignment Plan for this consignor.
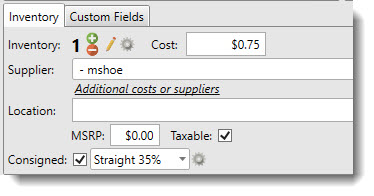
- On the Item Window, check the Consigned box and enter the Consignment Plan for the item. If the consignor has been chosen when entering the inventory, the default consignment plan will already be entered for that consignor.
The item can now be listed. When it sells, the selected consignment plan will be associated with the sale to calculate the payout. You will then be able to change the consignment plan on the sale if required without changing the consignment plan on the item.