See Also
- Adding Notes to an Item
- Adding Inventory Information on an Item
- Adding Weight and Dimensions to an Item
- Adding an Item from an Item Template
- Adding an Item from Scratch
- Creating Items
- Deleting Items
- Duplicating Items
- Entering Listing Upgrades
- Entering eBay Listing Information
- Entering eBay Shipping Information
- Entering Payment Information
- Entering Item Data
- Importing Data into SixBit
- Saving an Item as an Item Template
- Entering Title and Description
- Entering an Allocation Plan
- Entering Etsy Information
- Entering Product and Shipping Info
- Entering Tags and Materials
- Entering Categories and Attributes
- Entering Item Specifics
- Entering eBay Catalog Information
- Adding Items in Bulk
- Printing Inventory Labels
- Adding Pricing Information to an Item
- Adding Product Information to an Item
- Editing Items
- Entering Categories
- Managing Pictures on an Item
- Pictures
- Picture Storage
- Automatic Picture Processing
- Batch Changing Pictures
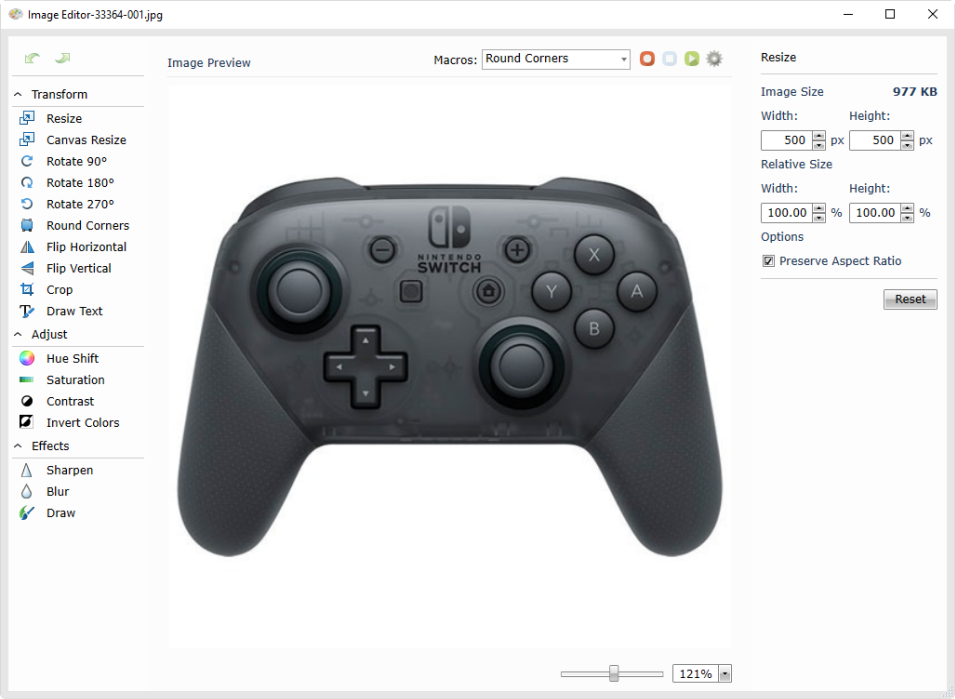
Using the Picture Editor
Everyone knows that good quality pictures help an item sell, but getting pictures into your listing can be one of the more time consuming tasks a seller has to deal with. There are many different ways users handle pictures, which usually involves connecting a camera to copy pictures or copying them from a memory card with very obscure names. Frequently, users will process the images in a picture editor that usually has many more features to navigate through than are necessary. Since pictures from cameras these days are very large, they need to be scaled and compressed. Then finally they are ready to be added to a listing program and uploaded.
SixBit has streamlined this process for eCommerce sellers. Since pictures are stored in the database, you can add them directly from the camera and do not have to worry about confusing file names any more. In the Small Business edition, you can even acquire images directly from a webcam while pictures are being taken. As they are added to the database, they are automatically compressed to give you the best quality with the fastest load time.
The integrated picture editor is also tailored to eCommerce sellers. It isn't bloated with tons of image effects and processing that you don't need. It sticks to the basics: crop, rotate, scale, brightness, contrast, etc.
To edit a picture in the picture editor:
-
While editing an item, navigate to the desired picture in the carousel and then double-click the picture carousel.
...OR...
Double-click any row in the Pictures grid on the Item window.
...OR...
Select any item in the Pictures grid on the Item Window and click the Edit icon ![]() in the toolbar.
in the toolbar.
-
Perform any of the following tasks from the options in the left hand sidebar:
| Action | Description |
|
Resize |
Resize the image to a specific pixel size or by a percentage. |
|
Resize Canvas |
Resize the canvas that the image is displayed on. This could give the effect of a border that would allow you to draw text or lines on. |
|
Rotate 90, 180, 270 |
Rotate the image |
|
Round Corners |
Round the corners. This could allow creation of images with slightly rounded corners all the way to perfectly round images. A border can also be added. |
|
Flip Horizontal |
Flip the image horizontally. |
|
Flip Vertical |
Flip the image vertically. |
|
Crop |
Select an area of the image to be cropped. |
|
Draw Text |
Draw text on the image. This is useful to add notes or point out parts of the image that are important. |
|
Hue Shift |
If the camera did not catch the colors correctly, Hue Shift can adjust them. |
|
Saturation |
Saturation can also adjust the amount of color in the picture. |
|
Contrast |
Adjust the contrast and brightness of the image |
|
Invert Colors |
Invert the colors for a special effect |
|
Sharpen |
Sharpen the image |
|
Blur |
Blur the image. |
|
Draw |
Draw lines on the image. This is useful to circle or draw arrows on the image to point out things that are important. |
|
Record Macro |
Records any changes made while recording so these operations may be repeated on other images |
|
Stop Recording |
Stop recording the macro |
|
Play Macro |
Run the macro on the image |
|
Manage Macros |
Opens the Manage Macros window where users can Rename, Delete, or re-order their saved image macros |