See Also
- Mapping Generic Shipping Services
- Adding a Customs Description Field Walkthrough
- Setting Up Integrated Shipping Partners
- Setting Up Endicia
- Setting_Up_Express_1
- Setting Up ShipRush for FedEx
- Viewing Postage Purchase History
- Mapping Values to Postage
- Setting Default Postage Label Printers
- Setting Up UPS Worldship
- Cancelling Orders
- Recording Missing Shipments
- Processing Returns
- Marking an Order as Shipped
- Recreating an Order
- Notifying Drop Shippers
- Customizing Drop Shipper Notifications
- Recording Tracking Numbers from Drop Shippers
- Adjusting Costs
- Receiving Payments
- Insuring Shipments
- Deleting Online Pictures
- Splitting and Combining Shipments
- Creating Orders
- Processing Orders
- Combining Orders
- Leaving Feedback
- Printing Packing Lists
Printing Postage and Carrier Labels
Printing postage and carrier labels directly from within SixBit is one of the best ways to improve efficiency and save time. Postage and labels can be printed through integrated carriers or plain mailing labels can be printed.
For example, you can:
- print USPS labels that include the shipping address and the postage through integration with Endicia
- print UPS or FedEx labels for your carrier accounts through integration with UPS Worldship or ShipRush for FedEx
- print plain mailing labels without any postage
Integrated Partners
SixBit has integrated with several partners to allow postage and carrier labels to be printed. To make use of this integration, sign up for the services offered by one or more of the following companies and then "flip a switch" to turn on SixBit's integration. SixBit The partners supported in your subscribed version are shown here:
| Company / Program | Postage/Label Type | Description | Where Can I Get It | Cost |
| Endicia | USPS (all types) | Endicia allows you to print any type of USPS Postage. Endicia offers both an online version (Endicia Label Server) and a desktop version (Dazzle). The online version is the easiest and cleanest to setup and use. The desktop version, Dazzle, offers you more options for your label sizes and layouts, but requires Dazzle to load each time you print labels. If you print on 4x6 or 6x4 labels and don't need to customize the layout of the label, then we highly recommend you choose the Endicia Label Server (ELS) option. | Click here to sign up for Endicia | Requires the Basic Label Server option for ELS ($15.99/mo.) Requires the Premium Subscription for Dazzle ($15.99/mo.) |
| UPS Worldship | UPS | UPS Worldship is UPS's own desktop software that allows SixBit to print UPS carrier labels. | You must have a UPS shipper account and be set up for scheduled pickup. Look for "Open a UPS Account" under the "Shipping" tab at www.ups.com. | Starting at about $10/wk. |
| ShipRush for FedEx | FedEx | ShipRush provides free tools to eCommerce sellers. We integrate with their tool for printing FedEx labels. | www.shiprush.com | No additional cost |
See Setting Up Integrated Shipping Partners to complete your integration before printing postage.
Printing Postage and Labels
To print postage and/or labels:
- Open the Ship Orders mode. How?How?
- From the grid, select the orders for which postage will be printed. Postage and labels will be printed in the order in which they are chosen.
- Click the Print Postage/Carrier Labels button in the ribbon bar. Any shipments in the selected orders that have not already been shipped will be loaded into the Print Postage and Carrier Labels window.
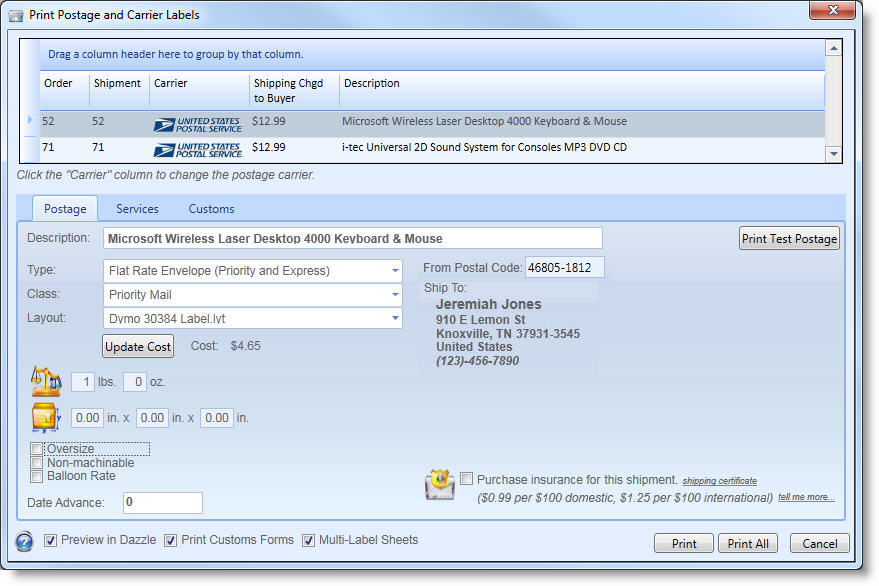
- For each shipment in the grid at the top, choose the Carrier. The list of carriers will include any carriers that have been integrated through a 3rd party as described in Setting Up Integrated Shipping Partners. By default, the carrier will be filled in with values from the shipment record, if they existed. If no carrier was specified on the shipment or if a non-integrated carrier was specified, the value in the Carrier field will state "Non-Integrated". If "Non-Integrated" is selected, a plain mailing label will be printed.
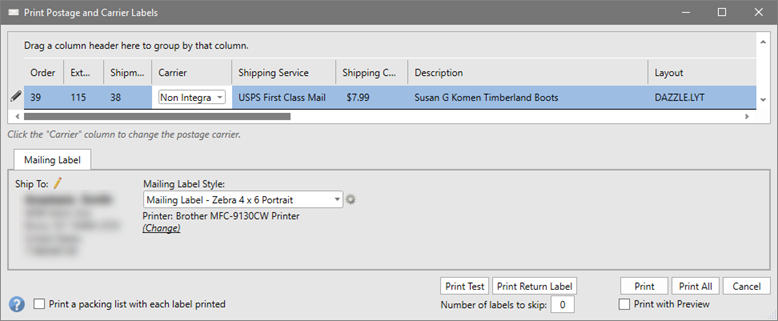
To edit mailing labels see https://www.sixbitsoftware.com/EN/Customizing_Reports.htm for steps to customize the mailing label report.
- Depending upon the carrier chosen, different tabs and input fields will appear below the grid. These are the input fields required by the shipping partner. Refer to the shipping partners documentation to understand how each field is used.
|
|
Shipments using Endicia allow an Endicia layout file to be entered. The layout chosen will be saved with each postage class so it does not need to be entered each time. |
- By default, the return postal code will be set to the return address in the profile, however if the item is being shipped from a different location, it can be specified in the From Postal Code input box.
- After setting all postage values, Print Test Postage can be clicked to ensure that the printer is set up properly.
- If the shipment does not automatically include insurance or the insurance included by the carrier does not include the full amount of the shipment, the Purchase insurance for this shipment box can be selected to purchase insurance through Shipsurance at greatly reduced rates. Costs for insurance purchases will appear on the SixBit invoice.
- If a packing list will be printed each time a postage label is printed, check Print a packing list with each label printed. If the packing list and postage printer is set to the same printer, alternating packing lists and postage will be received, which should make packaging items easier. For a walkthrough of how to set up a Zebra printer to do this, see Printing Alternating Packing Lists and Postage on a Zebra Printer.
- If everything looks good, click Print to print the selected shipment(s) in the grid or click Print All to print them all.
|
|
When printing USPS postage, the image of the postage will be saved for 48 hours. This will allow the postage window to be opened and for the postage to be printed again in case your printer jammed or the postage is lost. It is very important, however, that the same postage image is not printed and used twice. If the same postage image is printed and used twice, only the first package will be accepted when scanned at the post office and the other package will be returned. In addition, the Federal Government might see this as an attempt to defraud the post office. |
Reprinting a Postage Label
Sometimes printers do not always work as planned and a label that has already been printed may need to be reprinted. Any label can be easily reprinted by following almost the same process as printing the original.
|
|
When printing USPS postage, the image of the postage will be saved for 48 hours. This will allow the postage window to be opened and for the postage to be printed again. in case your printer jammed or the postage is lost. It is very important, however, that the same postage image is not printed and used twice. If the same postage image is printed and used twice, only the first package will be accepted when scanned at the post office and the other package will be returned In addition, the Federal Government might see this as an attempt to defraud the post office. |
To reprint a label or request a refund for USPS postage printed with Express One:
- Open the Ship Orders mode. How?How?
- If the order was automatically moved into the Fulfilled status when the original postage was printed, drag it back into the In Process status before proceeding.
- From the grid, select the order that will be refunded.
- Click the Print Postage icon in the sidebar bar OR click the Edit button on the ribbon bar to open the Order.Click the Print Postage button on the Order window.
|
|
The Print Postage button on the ribbon bar is designed to only act upon orders that do not have the postage already printed, so it cannot be used for refunds or reprints. Instead the sidebar button or the Print Postage button on the Order window, as described above, must be used. |
- The shipments for the order will be loaded into the Print Postage and Carrier Labels window.
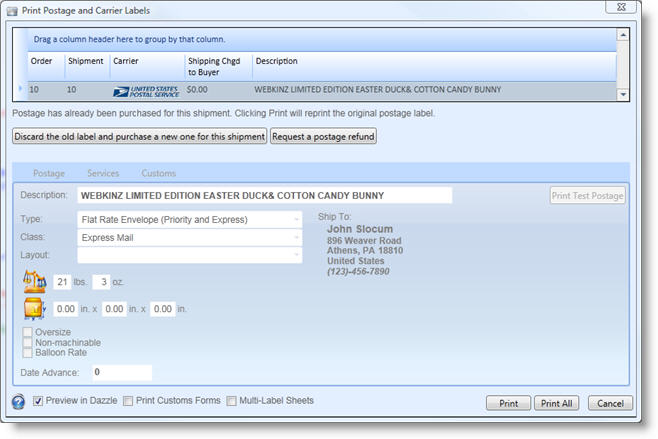
- From the time the postage is first printed, until the package is shipped, the Print button can be clicked to print another copy of the label to replace any labels that have been lost or destroyed by the printer.
Requesting a Refund for USPS Postage
When printing carrier labels for UPS or FedEx, no charges are assessed until the items are actually shipped. However, when printing USPS postage, charges are assessed at the time that the labels are printed. If a mistake was made on the label or if updated shipping address information was received, postage may need to be canceled, a refund must be requested, and the postage will need to be reprinted. If the postage was printed with Endicia Label Server, a refund can be requested from SixBit with a click of the mouse. If the postage was printed through Endicia Dazzle, the Endicia procedures for requesting postage refunds must be followed.
To request a refund for USPS postage printed with Endicia Label Server:
- Open the Ship Orders mode. How?How?
- If the order was automatically moved into the Fulfilled status when the original postage was printed, drag the item back into the In Process status before proceeding.
- From the grid, select the order that will be refunded.
- Click the Print Postage icon in the sidebar bar OR click the Edit button on the ribbon bar to open the Order.
- Click the Print Postage button on the Order window.
|
|
The Print Postage button on the ribbon bar is designed to only act upon orders that do not have the postage already printed, so it cannot be used for refunds or reprints. Instead the sidebar button or Print Postage button on the Order window, as described above, must be used.. |
- The shipments for the order will be loaded into the Print Postage and Carrier Labels window.
- From the time the postage is first printed, until the package is shipped or 10 days have passed (whichever is first),the Request Postage Refund button can be clicked to have your account credited with the refund.
|
|
After requesting a refund, the original postage must be immediately destroyed. It will no longer work and will result in return shipments if it is attempted to be used. |
To request a refund for USPS postage printed with Endicia Label Server from the Purchase History window:
- Open the Ship Orders mode. How?How?
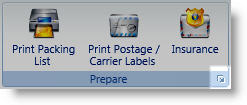
- Click the dialog launcher arrow in the lower right corner of the Prepare group to open the Manage Printing window.
-
Click the View your Endicia postage purchase history link.
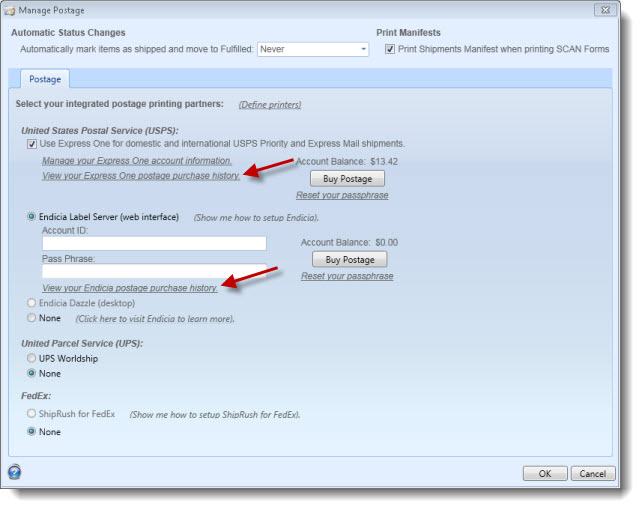
- The postage purchase history window will appear.

-
Select a purchase and click Request Refund and follow the prompts..
-
Click Done when finished.